


CI/CD Send email serverless function in AWS
by Rebeca Murillo • 20 December 2023
Introduction
In this tutorial I will go through the process of developing a simple service to send emails with Simple Email Service (AWS SES), and deploying it as a serverless function in AWS Lambda direcly from my Github repository !
I’m using this service for my website, for the contact form. I was looking for a simple and quick solution to securely send emails from my website, whitout exposing my email provider secrets publicly. Serverless function is the quickest and cost efficient solution to deploy a secure Rest API route for a simple service like this one.
Step by step guide
The following guide will break down in the following steps :
- JavaScript function to send email with
nodemailer - Declaring the serverless function for AWS provider
- Authorizing your Github repository through an AWS role
- Setting up the Github repository workflow
The requirements for this guide :
- Nodejs and javascript basic knowledge
- AWS account
- Github repository
1. Send an email with nodemailer and aws-sdk
The following code implements nodemailer and aws-sdk, to send emails through Amazon Email Service SES.
The function handler is the entry point of the serverless function, that will be configured later.
The function takes environment variables for :
- the AWS region for the SES service
AWS_REGION_SES - the default from email
DEFAULT_FROM_EMAIL - the default to email
DEFAULT_TO_EMAIL
File index.js
//index.js
const AWS = require("aws-sdk");
const nodemailer = require("nodemailer");

const AWS_REGION_SES = process.env.AWS_REGION_SES;
const DEFAULT_FROM_EMAIL = process.env.DEFAULT_FROM_EMAIL;
const DEFAULT_TO_EMAIL = process.env.DEFAULT_TO_EMAIL;

AWS.config.update({ region: AWS_REGION_SES });

const ses = new AWS.SES({ apiVersion: "2010-12-01" });
const transporter = nodemailer.createTransport({
  SES: { ses, aws: { region: AWS_REGION_SES } },
});

exports.handler = async (event) => {
  console.log("event: ", event);

  const { recaptchaResponse, to, from, subject, text } = JSON.parse(event.body);

  // Step 1: Validate input parameters
  const inputValidationResult = validateInputParameters(
    to,
    from,
    subject,
    text
  );
  if (!inputValidationResult.valid) {
    return response(400, { message: "Invalid input parameters" });
  }

  // Step 2: Send email
  const emailSendingResult = await sendEmail(to, from, subject, text);
  if (emailSendingResult.error) {
    return response(500, {
      message: "Error sending message",
      error: emailSendingResult.error,
    });
  }

  return response(200, { message: "Email sent successfully" });
};

function response(statusCode, body) {
  return {
    statusCode,
    body: JSON.stringify(body),
  };
}

function validateInputParameters(to, from, subject, text) {
  if (
    typeof to !== "string" ||
    typeof from !== "string" ||
    typeof subject !== "string" ||
    typeof text !== "string"
  ) {
    return { valid: false };
  }

  return { valid: true };
}

async function sendEmail(to, from, subject, text) {
  const params = {
    from: from || DEFAULT_FROM_EMAIL,
    to: to || DEFAULT_TO_EMAIL,
    subject,
    text,
  };

  try {
    let info = await transporter.sendMail(params);
    console.log("Message sent: %s", info.messageId);
    return { success: true };
  } catch (error) {
    console.error("Error sending message: ", error);
    return { error };
  }
}
2. Serverless function for AWS provider
The following code declares a serverless function that will be interpreted by serverless node package. The file serverless.yml needs to be placed at the root of the repository.
The deployment of the function is then launched by the command line :
npx serverless deployRefer to AWS documentation for Building Lambda functions with Node.js
In the following file, we can highlight :
- sets the provider as AWS
- using nodejs version 20 as runtime
- deploys to a AWS_REGION specified as a parameter
- sets the role for the function, in this case are SES actions
- sets environment variables from instruction parameters
- declares a function named
sendEmail, its entry point is the habler function declared at the index fileindex.handler - created a REST API route AS POST
/message
The environment variables are passed with the param option :
npx serverless deploy --param="AWS_REGION=${{ env.AWS_REGION }}" --param="DEFAULT_FROM_EMAIL=${{ env.DEFAULT_FROM_EMAIL }}" --param="DEFAULT_TO_EMAIL=${{ env.DEFAULT_TO_EMAIL }}" File serverless.yml
# serverless.yml
service: nodemailer-ses

provider:
  name: aws
  runtime: nodejs20.x
  region: ${param:AWS_REGION}
  stage: production
  iam:
    role:
      statements:
        - Effect: "Allow"
          Action:
            - "ses:SendEmail"
            - "ses:SendRawEmail"
          Resource: "*"
  environment:
    AWS_REGION_SES: ${param:AWS_REGION}
    DEFAULT_TO_EMAIL: ${param:DEFAULT_TO_EMAIL}
    DEFAULT_FROM_EMAIL: ${param:DEFAULT_FROM_EMAIL}

functions:
  sendEmail:
    handler: index.handler
    name: sendEmail
    description: Send email using nodemailer and AWS SES
    events:
      - http:
          path: message
          method: post
This configuration launches a AWS Cloudfront stack with a nodejs template, which does the following actions :
- copy the project sources to a S3 bucket
- create a Lambda function
- setup API Gateway to point to the function
- create a log group in CloudWatch
- create a IAM role with the correspoding permissions for the function
So far, steps 1 and 2 can be run locally on our computer. We can move on to steps 3 and 4 to automate the deployment and updates of our serverless function from our GitHub repository using GitHub Actions.
3. Authorize your Github repository with an AWS role
Moving on, we are now going to set up our AWS account to connect it with GitHub Actions. To accomplish this, we need to create a role in AWS. This role will be used to configure the credentials in the GitHub Actions workflow.
Refer to the AWS documentation for more details about this process : Use IAM roles to connect GitHub Actions to actions in AWS
3.1. Create an OIDC provider for Github
To start off, we need to create an identity provider for GitHub.
- In the AWS Console, go to Identity and Access Management (IAM), under Access Management > Identity Providers
- Click on ‘Add a new provider’ :
- provider type : ‘Open ID Connect Provider’
- provider URL :
token.actions.githubusercontent.com - Audience :
sts.amazonaws.com.
Once we have our identity provider established, we can proceed to create the role.
3.2. Create the AWS Role
- In the AWS Console, go to Identity and Access Management (IAM), under Access Management > ‘Roles’
- Click to create a “New role” :
- Entity type: Web identity.
- Select the identity provider we created in the previous step. The audience will be the default one.
- The GitHub organization is essentially your GitHub account where the project is hosted.
- The name of your GitHub repository
- The branch in your Github repository that will be allowed to run the Github Actions workflow
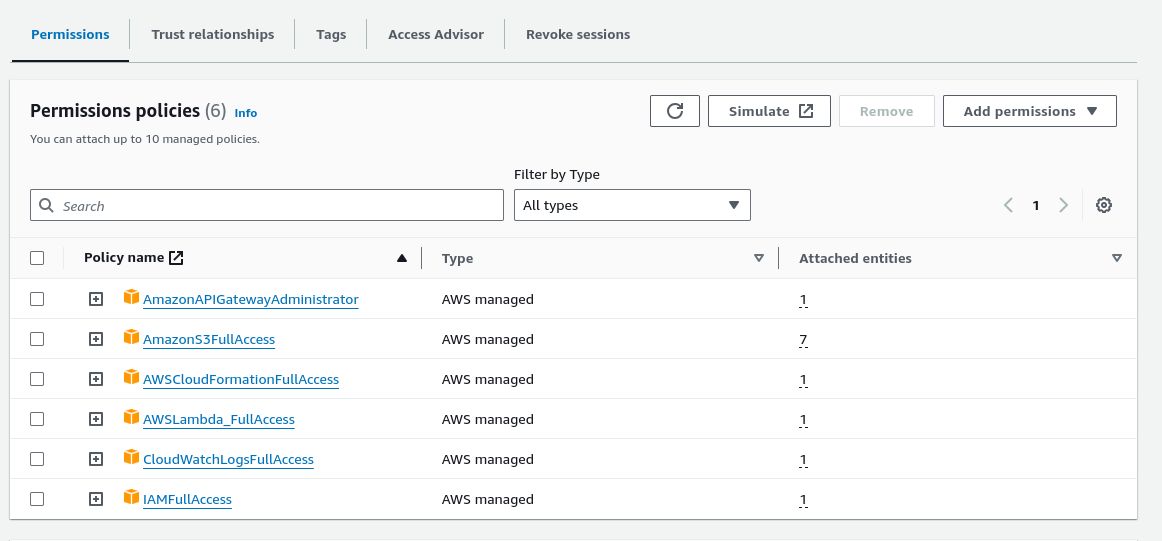
- In the Permissions Policies step, setup the rules according to the actions that will be executed by the Github Actions workflow. For this tutorial, the permissions required are :
- CloudFormation full access : which executes and orchestratesthe deployment process
- API Gateway : to publish the REST API route for the function
- S3 access : used to copy the repository content
- AWS Lambda : for the deployment of the serverless function
- IAM access : used to create a role with the permissions specific to the function
- Save the new role
Upon creating the role, open it to copy the ARN (Amazon Resource Name), which is needed in the next step for setting up the secrets in GitHub.
4. Github Actions workflow to serveless deploy in AWS
Finally, the repository is setup to execute the deployment with a Github Actions workflow.
The following file declares a Github Actions workflow that runs the following actions :
- runs manually, to customize the workflow trigger refer to Github documentation on Events that trigger workflows
- sets permissions for connection with AWS
- sets environment variables from Github secrets
- connects to AWS through an AWS role with action
aws-actions/configure-aws-credentials - deploys the function with serverless node package and passes parameters
npx serverless deploy --param="AWS_REGION=${{ env.AWS_REGION }}"…
name: Deploy to AWS Lambda

on:
  workflow_dispatch:

permissions:
  id-token: write
  contents: read

env:
  AWS_REGION: ${{ secrets.AWS_REGION }}
  AWS_ROLE_ARN: ${{ secrets.AWS_ROLE_ARN }}
  DEFAULT_FROM_EMAIL: ${{ secrets.DEFAULT_FROM_EMAIL }}
  DEFAULT_TO_EMAIL: ${{ secrets.DEFAULT_TO_EMAIL }}

jobs:
  deploy:
    runs-on: ubuntu-latest
    steps:
    - name: Checkout code
      uses: actions/checkout@v4
    - name: Use Node.js
      uses: actions/setup-node@v4
      with:
        node-version: 20
    - name: Install dependencies
      run: npm ci
    - name: Configure AWS Credentials
      uses: aws-actions/configure-aws-credentials@v4
      with:
        role-to-assume: ${{ env.AWS_ROLE_ARN }}
        aws-region: ${{ env.AWS_REGION }}
    - name: Deploy Lambda function
      run: |
        run: |
          npx serverless deploy --param="AWS_REGION=${{ env.AWS_REGION }}" \
            --param="DEFAULT_FROM_EMAIL=${{ env.DEFAULT_FROM_EMAIL }}" \
            --param="DEFAULT_TO_EMAIL=${{ env.DEFAULT_TO_EMAIL }}"
Setup the secrets on your Github repository, under Settings > Secrets and variables > Actions
- AWS_ROLE_ARN : the role created in step 3.2
- AWS_REGION : the AWS region where the resources will be deployed
- DEFAULT_FROM_EMAIL : default from email for the function
- DEFAULT_TO_EMAIL : default to email for the function
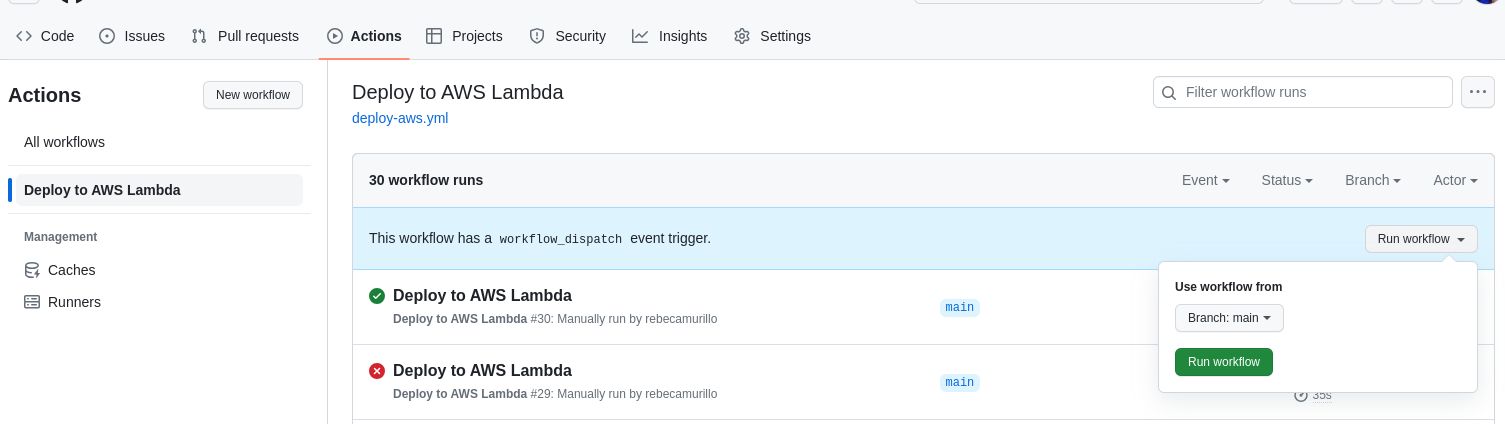
To run the workflow on your Github repository, under Actions > select the workflow > run workflow
If the setup is correct, you will see the progress of your deployment on your AWS account, in CloudFormation.
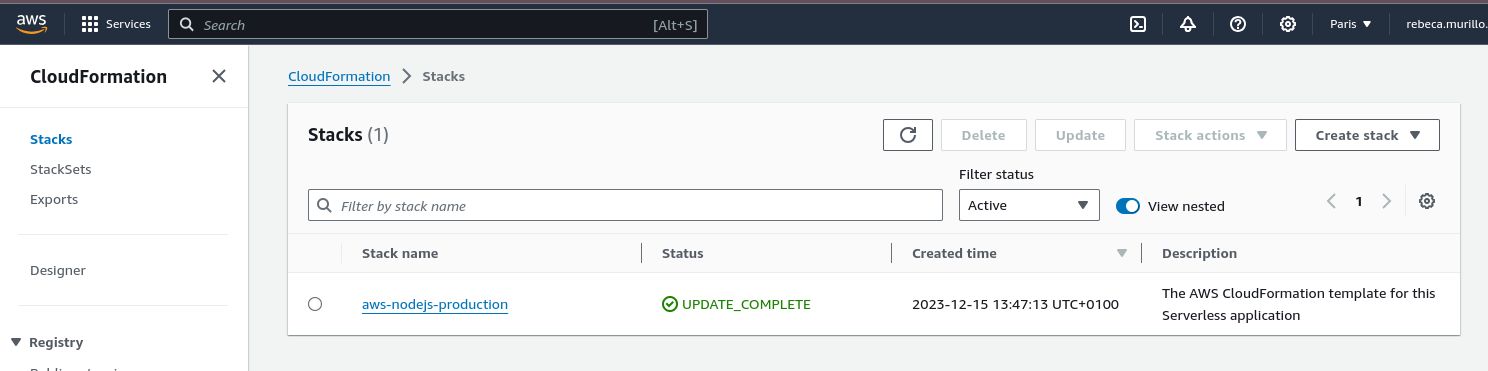
Identify the endpoint for your service under the Ouputs tab of your Cloudformation stack. You can now call your function with the complete path.
In our example, the function is available by calling the following route :
curl -X POST https://<unique id for resource>.execute-api.eu-west-3.amazonaws.com/production/message \
-H "Content-Type: application/json" \
-d '{
  "to": "myemail@gmail.com",
  "from": "myemail@gmail.com",
  "subject": "my new email",
  "text": "my email content text"
}'
Now you can start calling this endpoint to send emails with AWS SES service.
To go further, we can think about how to secure our serverless function. This will be a whole new tutorial comming up soon…